Recent years have seen a rise in the use of digital planners, and we understand all the rage about it. Honestly speaking, a digital planner is making our lives easier with its variety of features and customization possibilities. But are you new to the planning world and want to know how to use a digital planner? Then you have landed in the right spot. In this article, we’ll look at how to use a digital planner, covering everything from the basics to the more complex techniques.
Getting Started with a Digital Planner
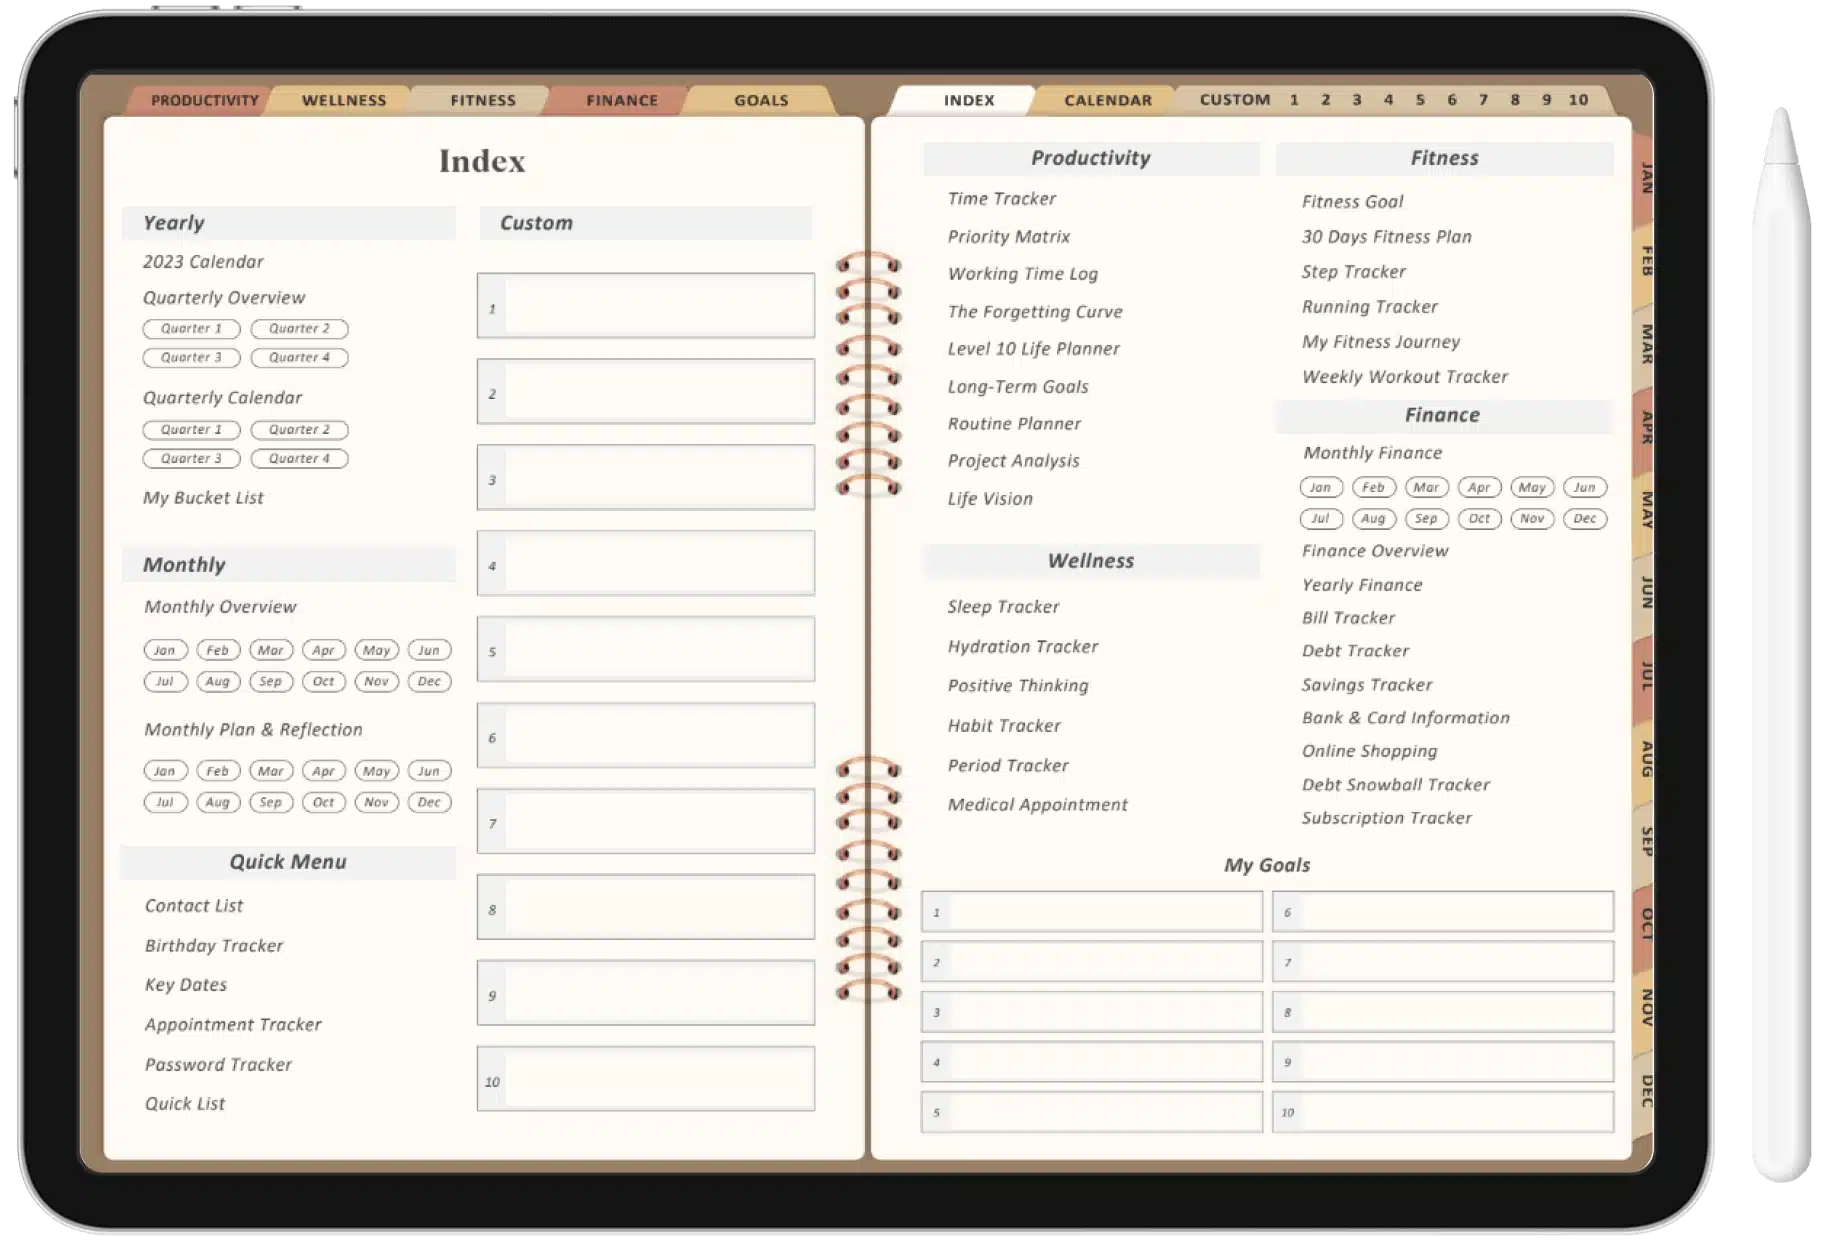
It might seem overwhelming at first to switch to a digital planner from a paper planner. And you might be confused about how to use a digital planner. To begin with, we have to understand what a digital planner is. A digital planner is a downloadable and editable PDF meant to be used with note-taking apps like Notion, Goodnotes, and Xodo. These digital planners come in various forms to meet individual needs and can be used as easily as paper planners.
What do we need to use a digital planner?
- The first step is to get a digital planner. Boss personal planners come with a variety of options. You may invest in a digital 100-day calendar or start out small by buying monthly or weekly planners.
- The next step is to choose software or an app compatible with your device. Selecting an app or software programme that meets your demands is crucial because there are plenty of choices available. Several well-known platforms include:
GoodNotes: If you use an iOS device, then GoodNotes is the best option for you. This software is compatible with all iOS devices and has special features, like the ability to import and export files and recognise handwriting.
Notability: It is another well-liked iOS app with features including voice note recording and handwriting recognition.
OneNote: This Microsoft programme can be downloaded on any of your devices, whether they are iOS, Android, or Windows. It has features including cross-device syncing and handwriting recognition.
Evernote: Another fascinating app with capabilities like handwriting recognition and cross-device syncing, Evernote is accessible on Windows, iOS, and Android platforms.
Getting familiar with digital planner features
Before you purchase your digital planner PDF or software, you should be familiar with the features that will help you in your digital planning.
- Hyperlinks: A digital planner comes with tabs on its side, like the pages of a paper planner. When you click on the hyperlinked tab, it takes you to the desired page. So, there is no unnecessary waste of time needed to flip through a book.
- Inserts: This feature lets you add extra pages to your planner. These are the digital counterparts of the fitness, mood, money planners, and budget trackers you create on paper. Inserts are a terrific approach to figuring out what you’ll be using your planner for. For example, you can add inserts such as a budget planner and a time tracker to make a planner with a business theme.
- Stickers: They are the digital equivalent of those paper planner drawings, washi tape additions, and doodling that you love! Since they are typically already pre-cropped in PNG format, copying, pasting, and duplicating them into your planner is very simple.
- Lasso Tool: You may “lasso”—that is, pick out—or “capture” the exact element you wish to import into your planner with the Lasso Tool. Let’s say you have a sticker page (a large, uncropped sticker sheet) and you want to pick out a few stickers. All you have to do is circle the desired sticker with the Lasso Tool, copy it, paste it, and it’s done! The sticker has been transferred.
- Search and Filter: To help you locate particular activities, events, or notes quickly, digital planners come with search and filter functions. If you have a lot of data in your planner, this can be helpful.
- Markers and pens: There are infinite options for pens and markers, and you never run out of stationery.
These general features are available on almost every device and app. But to learn how to use a digital planner smoothly, we must gain an understanding of how it works on various devices, like iOS and Android.
How do I use a digital planner on Android?
- You don’t need to possess an iPad if you want to use a digital planner on your device. Many Android tablets are compatible with digital planner apps. Once you have the device, it is really simple to use a digital planner on Android. Let’s guide you through it step-by-step.
Loading the app
- Go to the Google Play Store and download any preferred note-taking app. The ones recommended, like Noteshelf and Evernote, work seamlessly with Android devices.
- Once the installation is finished, the note-taking app shows on your home screen. Click on it to open it.
Importing the file
- To open your digital planar PDF on the app, select the “import” tab and add the desired file from your device.
- Or, go to “downloads” on your File Manager, click on the PDF, and “open with” Noteshelf or Evernote.
Adding stickers and photos
- Download and extract the sticker file you find cute to be used for your daily planning.
- Click the Plus (plus) sign in the upper left corner of the Noteshelf app.
- It will take you to the “downloads” folder on your device. Now click on the photos or stickers you want to import.
- You can move, crop, and resize the sticker inside the planner by using the lasso tool.
Setting Alarms and Reminders
- Open Noteshelf, and click on the calendar to select the day. Click on the time of the day you want to set a reminder for. This will take you directly to a Google Calendar showing the specific time. Add a title to the task.
- Now select the alarm icon on Google Calendar and set your alert reminder. Click on the “save” button to finish the task.
- Go back to the app and click on the Google icon to see all the tasks you have scheduled so far.
How to use a digital planner on an iPad
Getting started
- Download the PDF of the planner you have purchased from Boss Personal Planners.
- Also, download or purchase any note-taking app like Notion or Goodnotes from the Apple App Store.
Importing files
- As the app opens, you will see a “+” icon, which takes you to the file manager of your iPad. Select the file of your choice, and voila! The file is imported into the app.
- The app also gives you the option to start a “notebook.” You will get multiple layouts and colours for pages and sizes as you select “notebook” from the drop-down menu of the “+” icon.
Taking down notes
- This is the easiest step in our journey of learning how to use a digital planner on an iPad. Simply click on the pen icon and start jotting down with the help of your stylus or Apple Pencil.
- Fill out pages as you go on and access them easily from the hyperlinked tabs on the right-hand side.
Using the ‘Lasso’ tool
- Tap on the lasso icon to move photos, stickers, and objects around the page. Encircle the item you want to move, and to release it in the desired area, click outside the circle.
Exporting files
- Switch to library mode view, click on “document,” and select “Export All.” Or, click on the checkmark icon situated at the upper right corner, select “document,” and then “Export All.”
- If you are in the document view, select “Export All” by tapping the Share icon in the menu bar.
Synchronise Google with a digital planner.
- Sign in to your device with the same Apple ID and enable iCloud.
- For iPad/iOS: Launch the Settings menu on your gadget and select “Sync this iPad” under Apple ID > iCloud. Select “Apps syncing to iCloud” and make sure “GoodNotes” is enabled in the list.
- macOS: Click System Preferences, select Apple ID, then iCloud Drive, and turn on “Sync this Mac.” Tap “Apps syncing to iCloud Drive” and select “GoodNotes” from the drop-down menu.
Using a digital planner on an iPhone is the same as using it on an iPad. So to learn how to use a digital planner on an iPhone, follow the instructions under “How to Use a Digital Planner on an iPad.”
FAQs
How do I back up a digital planner on an iPhone?
- Open Notion or Goodnotes and click on “Members and Settings.”
- After selecting “Settings,” go down the page and select “Export all Workspace Content.”
- Choose the appropriate download option.
- In the end, select Export to start downloading the file to your local storage.
Can I link my digital planner to other devices?
Yes, you can synchronise your digital planner with a number of devices, including desktop computers and Android and iOS smartphones. This enables you to stay organised while on the go.

Hey there! I’m Megan Taylor, an entrepreneur with a fire in my belly for using technology to change the game. I’m passionate about launching ventures that make a real impact, and I’m always on the lookout for the next big thing in digital innovation.
What gets me going?
- Building Businesses: I love the thrill of taking an idea and turning it into a reality. From crafting strategies to watching a business flourish, the journey is what excites me.
- Tech Transformation: Technology is constantly evolving, and I find it fascinating to explore how it can revolutionize different aspects of our lives.
- Smart Solutions: Give me a problem, and I’ll find a tech-powered solution! I’m drawn to gadgets and apps that can simplify our daily routines and empower us to do more.
Why You’re Here:
If you’re looking for insights on the latest tech trends, reviews of ingenious gadgets, or tips on using apps to streamline your life, you’ve come to the right place. I love to share my knowledge and experiences, and I’m always eager to connect with fellow tech enthusiasts.
Let’s Explore Together!
Whether you’re a seasoned entrepreneur or just starting your digital journey, I invite you to join me on this adventure. We can discuss the latest tech breakthroughs, share tips and tricks, and explore how technology can help us build a better future.
Feel free to browse my articles, leave comments, and connect with me on social media. Here’s to pushing boundaries, embracing innovation, and using technology to make a positive impact!